Pages

Showing posts with label 2nd Grade. Show all posts

Tuesday, March 26, 2013

2nd Grade Clay Frog in Monet's Garden


I came across an image of this lesson while on Pinterest one night. The link led me to Monroe Elementary School Artsonia site; http://www.artsonia.com/museum/art.asp?id=18162652&exhibit=508137&gallery=y I don't know if the art teacher knows her image was pinned but I am very thankful that it was; my students LOVED this lesson!

"Clay Frogs" is a frequent 2nd grade lesson for me to teach; it combines a review of how to make a pinch pot, which they learned in 1st grade, with learning the clay technique for attaching pieces of clay together - scoring with slip.


Adding an introduction the the artist Claude Monet and the book, "Philippe in Monet's Garden" really gave depth to the lesson.


March 27, 2013
P.S.
Yowza! The internet is just AMAZING! The day after I posted this, Theresa McGee, the art teacher that created this lesson, left a comment below! Check it out; she also left a link in her comment to her original lesson plan. THANK YOU!
Theresa, your Artsonia lessons are really beautiful! Do you have a blog? I'd sign up to follow it in a heartbeat. :)

Tuesday, July 3, 2012

2nd Grade Butterflies


Mother’s Day was approaching and I wanted to do something with my 3rd graders that they could take home as a gift. We had already finished one clay lesson but I thought, “Let’s go for it!” I had the clay, the time and the students were delighted to have more than one clay lesson this year. So Clay Butterflies here we come!

Note: Did you see the typo? I labeled this a 2nd grade lesson but made these with 3rd grade. 3rd grade students had already made a clay sculpture, which is right in line with the skills I wanted to introduce to them. About halfway through these butterflies I realized it would be more in line with the skills I was working on with 2nd grade rather than 3rd grade. Students learned a lot from the whole process, but next year I’ll teach this to 2nd grade.
Next Note: This is an add on from the original post... I was cruising through Pinterest yesterday and came across the original idea for these clay butterflies! It does not have the original source listed so I cannot send you to the site. Sorry. It looks like it was made by adult and doesn't have texture on it, just multiple glaze colors.

• Students drew one side of the butterfly (specifically avoiding making the letter “3” and instead focused on the curves that made up each part of the wing.) I had butterfly visuals up on the overhead projector and had enough images that I placed 4-5 butterfly pictures on each table. (I love my picture file!)
• With one side complete, students drew the opposite side of the butterfly without folding the paper and copying. I asked them to closely observe the lines/curves that they drew on the one side and had them try to repeat it just through observation on the opposite side.
• When the drawing was complete students cut out their butterfly shape.
• I gave a demo on rolling out a slab, placing the butterfly paper shape on the slab of clay and cutting it out.
• Next up was applying texture to our butterflies. I had ordered these texture strips below earlier in the school year and was a little taken aback when I saw how narrow they were. The students were enchanted by all the textures to choose from and tried all different ones on their butterflies.


The texture tools we used on the butterflies came from Sax Arts & Crafts catalogue. Here is the info:


• We had rolled up newspapers into balls and taped them to secure the round shape during an earlier project. I had saved the newspaper balls. When all the texture was applied to the butterfly, we carefully flipped them onto the ball of newspaper, texture side down. We got them all balanced and let them dry. If you look at the "4th Grade Clay Leaves" (see Labels: "4th Grade,") you’ll see the newspaper balls.
• After the clay was bisque fired it was time to glaze. I limited the ability to add detail by not putting out the smaller brushes. (We only had that class period to glaze.) If a student was absent the day of glazing, they were able to paint the butterflies with tempera paint and seal it with Mod Podge.


• When the butterflies came out of the kiln we had one week to spare! We decorated white lunch bags for Moms, Aunts, Grandmothers or a special woman in the student’s life, carefully wrapping the butterflies with newspaper and placing them in the decorated bag. A little ribbon finished off the gift bag.


Do you remember my post on making clay stamps? (It's posted under the label, "Clay Tip.") These butterflies would be a perfect lesson to use your homemade clay stamps on.

Tuesday, December 27, 2011

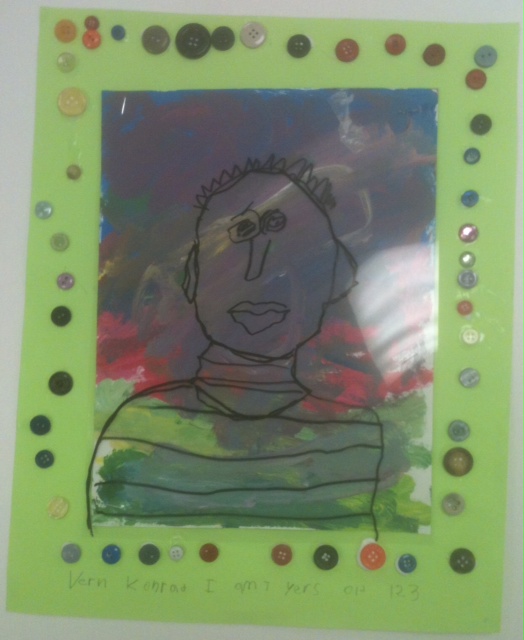
Second Grade Self Portraits

Second grade students created their self portraits by going through a number of stages and materials.


I was inspired by a lesson I found on The Incredible Art Dept. site. This particular lesson had students connect self portraits with the artist Peter Max and The Statue of Liberty. (http://www.princetonol.com/groups/iad/lessons/elem/selfport.htm) -You will find the lesson by scrolling down about a third of the page.
I tweaked the lesson to meet the needs of my second graders.


The second graders started this lesson by drawing a self portrait. After that, the lesson fell off the track of normal expectations as everybody used a black Sharpie marker to trace their self portrait drawing onto a sheet of transparency.

When the tracing was complete the self portraits were put aside and the tempera paint came out. Students painted the colors that reflected their personality onto a sheet of paper with lots of color mixing.


When dry, students stapled their self portrait transparency on top of their painting, mounted it onto a colored piece of construction paper and used buttons to decorate the borders.

Saturday, November 12, 2011

2nd Grade Stars and Stripes

2nd Grade classes finished Stars and Stripes just in time for Veteran's Day!
I found this lesson on Mrs. Picasso's Art Room Art Blog. http://mrspicassosartroom.blogspot.com/ Thank you for sharing this! It was posted in her Flickr Photostream area. Bells and whistles went off when I saw it! Tissue paper collage, printing, "how to draw a star" and Jasper John's... lots of wonderful concepts to explore! Fortunately it took a couple of classes to complete so I broke down the concepts into manageable pieces.
After completing their artwork, students got busy creating Thank You cards for veterans. It was great using the scraps left from the Stars and Stripes. Lots of variations happened on the cards, including students cutting out a lot of small stars and adding them to their design. The second grade classroom teachers worked with their classes writing the note that went inside the Thank You cards. One classroom teacher had her students write short descriptive paragraph about Veteran's Day and posted them on the bulletin board with all of the Stars and Stripes.
After school on Friday I dropped off the cards at nursing homes in Green Bay and DePere, WI. I sent an email out to the staff inviting them to take a Thank You card to share with any veterans that they knew. Several teachers came down for a card, and one offered to take the remaining cards to a friend who will get them to active servicemen from our area. Sweet!
The heart design on the cards came from Mrs. Picasso's Flickr Photostream too.

Drawing a star is a challenge for second grade, but they were excited to try it! Everyone flipped their dry tissue collage paper over and practiced two small stars on the back of the paper before tackling a big one in the middle of their paper. After this I brought out tracer stars and students had the choice of using their own drawn star or using the tracer.