Tuesday, February 21, 2012
Adaptive Art Valentine Frames
A week before Valentine's Day I found some great wooden picture frames for ONE DOLLAR at Michael's Crafts! My Adaptive classes are very small this year so it didn't break my budget to pick a few frames up.
Day one we used rather small blown up balloons to stamp red, magenta and white tempera paint onto the wooden picture frames. When we cleaned up this part of the lesson one class rolled pink, white and purple painted marbles around on a paper and let it dry. In my other adaptive class Jason made a beautiful drawing of his mother.
Day two everyone once again LOVED peeling the backing off of sticky hearts and placed them wherever they wanted on their frames. In the marble painted paper class students cut thin strips of marble painted paper out and randomly glued them onto paper that was trimmed down and placed in the frame window. Jason's portrait was trimmed down and placed into his frame window. That is Jason's frame above. Mom is beautiful!
Adaptive Paper Plate Fish
I stumbled upon Paper Plate Fish picture and loved the simplicity of it, so I gave it a different look and changed it to meet the needs of my Adaptive Art students. I think they turned out great and there was a lot of interesting art experiences along the way.
So this is the simple fish we started with. We cut a triange out of a paper plate. The space left from the missing triangle became the fish mouth and the triangle itself was stapled opposite the mouth and became the fish tail. We got out blue and green liquid watercolors (made by recycling crayola markers -love that tip!) Students dipped their paintbrush into one color and moved it around on their paper plate then cleaned their brush and dipped into the second color. All mixing happened on the fish itself.
When the fish was painted students ripped paper for the sand in the water, green paper for plant life and shiny silver paper (which they all loved peeling the paper back off of!) as the sparkle in the water. -A bit like rainbow fish but the students loved sticking the silver paper on so much just a couple of little shiny spots wouldn't do...
Of course glitter finished the picture off. Some added a lot of glitter glue and some chose to add very little. A little painting, a little ripping and dot gluing, and a little silver paper peeling made a very engaging lesson.
Tuesday, December 27, 2011
Third Grade Shrinky Dink Snow Globe Necklaces
The week before Christmas most the students had an extreme case of the wiggles. I set up a one day lesson with my third graders making snow globe necklaces out of Shrinky Dink.
It worked like a charm; it caught everyone’s interest, the students quickly quieted down as they concentrated on creating a design and then transferred the design onto the Shrinky Dink. (I reviewed Landscapes with the students and they brain stormed winter and holiday ideas.)
It was coloring with colored pencils from there, with highlights of silver or gold markers. All the students quietly cheered as their snow globes shrunk in the toaster oven. I had black cording precut and that sped up assembling the necklace.
It worked like a charm; it caught everyone’s interest, the students quickly quieted down as they concentrated on creating a design and then transferred the design onto the Shrinky Dink. (I reviewed Landscapes with the students and they brain stormed winter and holiday ideas.)
It was coloring with colored pencils from there, with highlights of silver or gold markers. All the students quietly cheered as their snow globes shrunk in the toaster oven. I had black cording precut and that sped up assembling the necklace.
5th Grade Overlapping Hands
I came across some pictures of the Square 1 Art lesson my 5th graders did last year. This was my usual "go to" lesson; the students love it and the designs all turn out with deep, rich colors.
The company has a newly designed web page and after a quick look I could not find the "Lesson Ideas" section. If I find the link I'll come back to this post and paste it in.
First Grade Fall Trees
First grade students created beautiful fall trees using a variety of materials.
A couple weeks before starting this lesson it was my luck to read Tisha’s blog post; http://tishalou.blogspot.com/2011/11/vaea-presentation-artful-power-of.html which was chock full of great book-art lesson connections. I found the book; “A tree is Nice” listed, and found it in my school library. What a great start to the lesson! It inspired some great discussions with my students.
On their white paper, students drew trees that had branches reaching out. (I did a simplified “V” tree demo.) After that we got out our crayons and considered all the colors that are on one tree. Students drew vertical lines of crayon colors on their trees.
Next up; paint shirts and watercolors. I gave a demo on mixing colors, how to clean off a color if it has a mixed color on it, and dragging the brush across the paper instead of scrubbing it on the paper.
Wow, first graders really love to paint! I went through the procedure of watercolor paint clean up and all stayed calm as everybody did their job.
A couple weeks before starting this lesson it was my luck to read Tisha’s blog post; http://tishalou.blogspot.com/2011/11/vaea-presentation-artful-power-of.html which was chock full of great book-art lesson connections. I found the book; “A tree is Nice” listed, and found it in my school library. What a great start to the lesson! It inspired some great discussions with my students.
On their white paper, students drew trees that had branches reaching out. (I did a simplified “V” tree demo.) After that we got out our crayons and considered all the colors that are on one tree. Students drew vertical lines of crayon colors on their trees.
Next up; paint shirts and watercolors. I gave a demo on mixing colors, how to clean off a color if it has a mixed color on it, and dragging the brush across the paper instead of scrubbing it on the paper.
Wow, first graders really love to paint! I went through the procedure of watercolor paint clean up and all stayed calm as everybody did their job.
Adaptive Art Q-Tip Snowflakes
With the holidays approaching it was time to start working on winter and/or holiday lessons with my Adaptive Art students, even though, oddly, there wasn’t a stitch of snow to be found in Green Bay.I do a lot of lesson searches for my adaptive students in preschool websites as they usually a good starting point with my particular group of students. I modify all lessons because a couple of my students are still working on grasping tools and supplies.
This lesson involved squeezing a small puddle of glue onto a piece of aluminum foil and laying Q-Tips that were cut in half, around the glue creating a radial design.
When the glue dried I peeled the glue/Q-Tips off of the foil and students glued them onto some paper circles that they had glittered.
This lesson involved squeezing a small puddle of glue onto a piece of aluminum foil and laying Q-Tips that were cut in half, around the glue creating a radial design.
When the glue dried I peeled the glue/Q-Tips off of the foil and students glued them onto some paper circles that they had glittered.
Second Grade Self Portraits
Second grade students created their self portraits by going through a number of stages and materials.
I was inspired by a lesson I found on The Incredible Art Dept. site. This particular lesson had students connect self portraits with the artist Peter Max and The Statue of Liberty. (http://www.princetonol.com/groups/iad/lessons/elem/selfport.htm) -You will find the lesson by scrolling down about a third of the page.
I tweaked the lesson to meet the needs of my second graders.
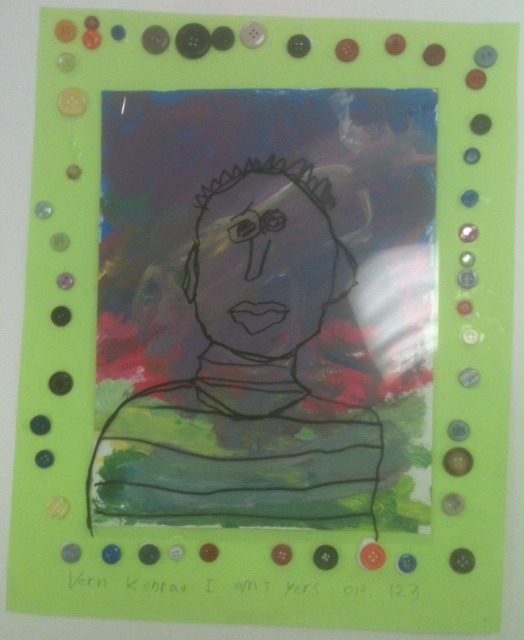
The second graders started this lesson by drawing a self portrait. After that, the lesson fell off the track of normal expectations as everybody used a black Sharpie marker to trace their self portrait drawing onto a sheet of transparency.
When the tracing was complete the self portraits were put aside and the tempera paint came out. Students painted the colors that reflected their personality onto a sheet of paper with lots of color mixing.
When dry, students stapled their self portrait transparency on top of their painting, mounted it onto a colored piece of construction paper and used buttons to decorate the borders.
I was inspired by a lesson I found on The Incredible Art Dept. site. This particular lesson had students connect self portraits with the artist Peter Max and The Statue of Liberty. (http://www.princetonol.com/groups/iad/lessons/elem/selfport.htm) -You will find the lesson by scrolling down about a third of the page.
I tweaked the lesson to meet the needs of my second graders.
The second graders started this lesson by drawing a self portrait. After that, the lesson fell off the track of normal expectations as everybody used a black Sharpie marker to trace their self portrait drawing onto a sheet of transparency.
When the tracing was complete the self portraits were put aside and the tempera paint came out. Students painted the colors that reflected their personality onto a sheet of paper with lots of color mixing.
When dry, students stapled their self portrait transparency on top of their painting, mounted it onto a colored piece of construction paper and used buttons to decorate the borders.
Subscribe to:
Posts (Atom)